
How Long Does a Typical Furnace Installation Take from Start to Finish?
Planning Your Heating Upgrade: Understanding the Complete Timeline
With the September pre-heating season officially here, you are likely asking: How long does a typical furnace installation take from start to finish? It is a critical question to answer before the cold weather sets in. Many homeowners underestimate the total time required for a compliant, fully permitted heating replacement. They often assume that because the physical swap takes just a few hours, the entire process can be completed in a single afternoon. However, scheduling a replacement during the busy fall season requires a much wider lens.
A proper, code-compliant installation involves several distinct phases. You have to account for the initial administrative planning, the physical labor on installation day, and the final regulatory inspections required by your local municipality. Setting realistic expectations for this entire timeline is the best way to ensure your home remains comfortable without unexpected delays. If you are looking to upgrade your system, securing reliable heating services early in the season is the smartest move you can make.
To help you plan, we will break down the complete chronological timeline of a standard replacement. You will learn exactly what happens during the initial consultation, how administrative lead times affect your schedule, what to expect on the day the technicians arrive, and why the project isn't truly finished until the final city inspector signs off.
Project Completion Timeline vs. Physical Installation Time
The most common scheduling miscalculation happens when homeowners confuse the physical installation time with the total project completion timeline. Understanding the difference between these two metrics is essential for planning your upgrade, especially in the Mountain View / Bay Area region. While our area generally experiences mild winters, nighttime temperatures drop significantly by late autumn, making a predictable, reliable timeline essential to avoid being left in the cold.
Physical installation time refers strictly to the hours the technicians spend in your home. For a standard swap, this usually ranges from 4 to 8 hours on a single day. This is the period where your old unit is removed, the new unit is set in place, and the system is tested for safety and airflow.
Total project completion time, on the other hand, spans from the moment you make your first phone call to the day the local municipal building department signs off on your final inspection. This overarching timeline can span anywhere from one to three weeks, depending on equipment availability, permit processing times, and inspection schedules.
Focusing only on the physical labor can leave you in a bind if your current system fails completely. If you wait until your unit breaks down to schedule a furnace installation, you will still have to wait through the administrative and permitting phases before the physical work can even begin.
• Physical Installation — Typical Timeframe: 4 to 8 Hours (1 Day) — What It Includes: Removing the old unit, installing the new equipment, connecting utilities, and safety testing.
• Total Project Timeline — Typical Timeframe: 1 to 3 Weeks — What It Includes: Consultation, load calculations, securing permits, ordering equipment, installation day, and final city inspections.

Phase 1: The Initial Consultation and Load Calculation
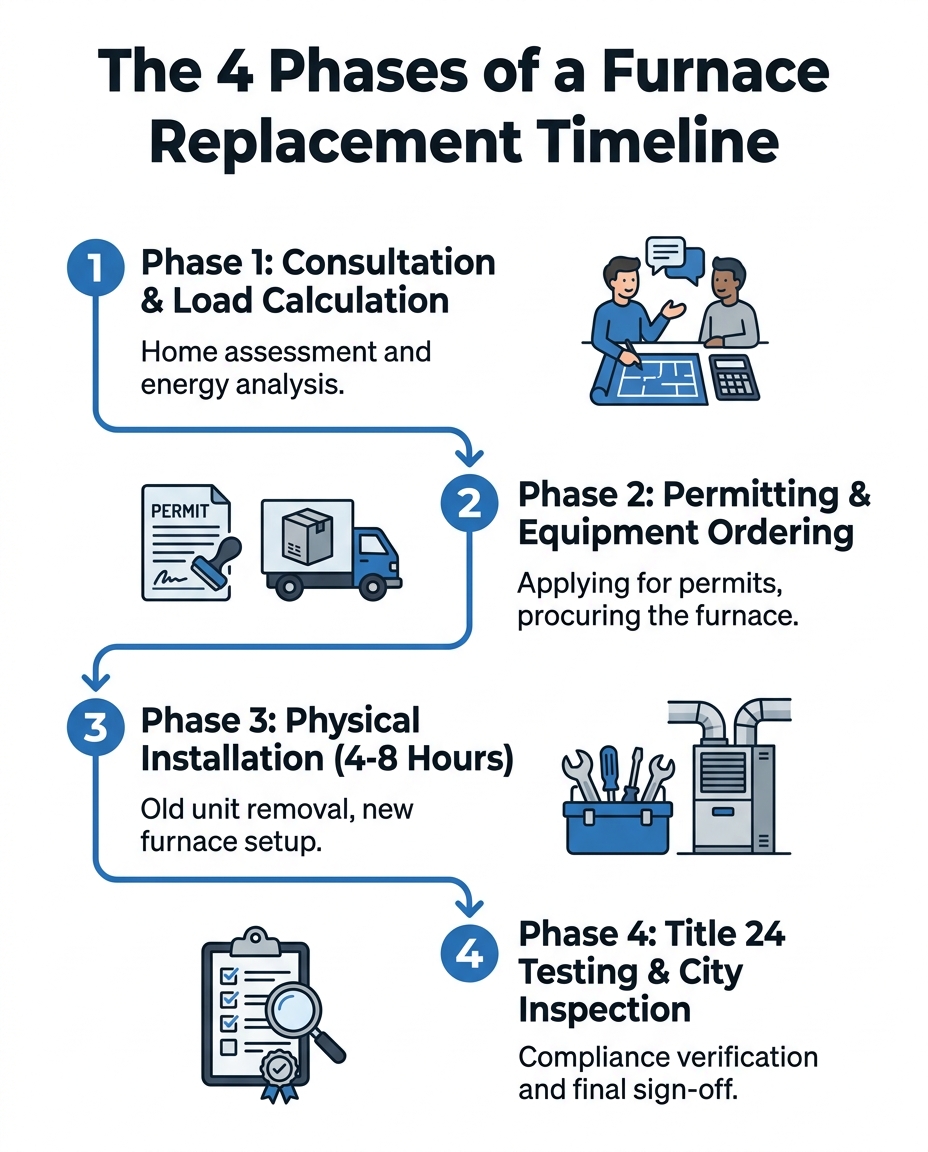
The total replacement timeline officially begins with a professional in-home evaluation. This is not a step that can be rushed or skipped. A high-quality installation requires a deep understanding of your home's unique thermal dynamics, which means the initial consultation is far more comprehensive than simply looking at the sticker on your old unit and ordering the same size.
During the September pre-heating season, scheduling this initial consultation early gives you a significant head start. The consultation phase usually takes about one to two hours in your home, but the data gathered during this visit dictates the rest of the project.
Why Load Calculations Take Time
A professional contractor will perform a formal load calculation (often referred to as a Manual J calculation) rather than just swapping a like-for-like system. This process takes time because the technician must measure several critical factors:
• Square footage and layout: Measuring the exact dimensions of the spaces that need heating.
• Window efficiency: Evaluating the number, size, and energy efficiency of your windows.
• Insulation levels: Checking the insulation in your attic, walls, and crawlspaces to determine heat retention.
• Ductwork condition: Assessing whether your current duct system can handle the airflow requirements of a modern, high-efficiency unit.
This meticulous measurement ensures the new unit will operate efficiently without short-cycling. A system that is too large will blast your home with heat and shut off quickly, leading to uneven temperatures and premature wear. A system that is too small will run constantly and struggle to keep up on cold nights.
Reviewing System and Payment Options
Once the load calculation is complete, the next step in this phase is reviewing your equipment options. Modern heating systems come with varying efficiency ratings (AFUE), staging options (single-stage, two-stage, or modulating), and blower motor types. Selecting the right equipment based on your household needs requires a thorough conversation.
This is also the time when your contractor will discuss generic energy rebates, utility incentives, or federal tax credits that might apply to high-efficiency models. Additionally, evaluating HVAC financing options occurs during this phase, ensuring you have the right financial arrangements in place before any equipment is ordered.
Phase 2: Securing Permits and Ordering Equipment
Once you have selected your new system and signed the agreement, the administrative clock starts ticking. This second phase is where homeowners often experience the most variation in the timeline, as it relies heavily on external factors like municipal processing speeds and supply chain logistics.
Before a single tool is lifted, your contractor must submit the necessary paperwork to local municipal building departments. In California, replacing a heating system is a major alteration that requires strict adherence to safety and energy codes. Pulling these permits ensures that the work will be inspected for compliance, protecting your home and your family.
The time it takes to secure a permit can vary wildly. Some municipalities offer over-the-counter or same-day online permitting for licensed contractors, while others may take several days or even a week to process the application. Administrative delays are common if this paperwork is not managed by an experienced contractor who understands the nuances of local HVAC permits and building codes.
Simultaneously, the contractor must order the equipment. During the September pre-heating season, equipment ordering lead times can fluctuate based on regional demand. If you select a highly popular model or a specialized high-efficiency unit, it might need to be shipped from a regional distributor. While many standard units are stocked locally and can be acquired in a day or two, high demand periods can easily add a week to the timeline just waiting for the exact model to arrive at the warehouse.
Phase 3: What Happens on Installation Day
After the permits are approved and the equipment is secured, the physical installation day finally arrives. For a straightforward, standard replacement in the Mountain View / Bay Area, you can expect the physical labor to take between 4 to 8 hours. However, this is a benchmark, not a guarantee. Every home is different, and several factors can extend the timeline to 10 to 14 hours, or occasionally push the project into a second day.
Factors that extend installation time include:
• Ductwork modifications: If the new unit has different dimensions than the old one, the sheet metal transitions (the plenum) must be custom-rebuilt to ensure a perfect, airtight seal.
• Accessibility issues: Units located in tight attics, cramped crawlspaces, or narrow closets take significantly longer to safely remove and replace than units sitting in an open garage.
• Fuel type changes or code upgrades: Upgrading gas lines, modifying electrical circuits, or installing new PVC venting for high-efficiency condensing furnaces adds hours to the job.
Important Note: The physical installation of a heating system involves high-voltage electricity, combustible fuel lines, and dangerous exhaust gases like carbon monoxide. This work requires licensed professionals and is never, under any circumstances, a DIY project.
Safe Removal of the Old Unit
The day begins with protecting your home. Technicians will lay down drop cloths and clear the workspace. The first technical step is safely disconnecting the old unit. This involves shutting off and capping the gas lines, disconnecting the high and low-voltage electrical wiring, and detaching the existing venting system. The technicians will then safely extract the outdated equipment and load it onto their trucks for proper environmental disposal.
Setting and Connecting the New Furnace
Once the space is clear, the new equipment is brought in and set perfectly level. This is where the custom sheet metal work happens. The technicians will modify the plenum or duct transitions to ensure smooth, unrestricted airflow into your home. After the unit is physically set, they will carefully connect the new system to the existing utilities, including the gas supply, the electrical breaker, and the exhaust venting.
Safety Testing and Cleanup
The final step of the physical installation is the commissioning process. The technicians will turn the system on and run it through its paces. They test for gas leaks using specialized equipment, measure the static pressure to ensure proper airflow, and verify that the thermostat is communicating correctly with the control board. Once the system is confirmed to be running safely and efficiently, the team will clean up the workspace, aiming to leave it cleaner than they found it.
Phase 4: Final City Inspections and Title 24 Compliance
Even though your new heating system is now running and keeping your home comfortable, the project is not truly finished. The final phase involves post-installation testing and municipal inspections to officially close out the permit.
In the Mountain View / Bay Area, replacing a heating system triggers California Title 24 energy code compliance. This state law requires specific testing for HVAC alterations to ensure the new system meets strict energy efficiency and safety standards. Typically, this involves a third-party HERS (Home Energy Rating System) rater visiting your home to perform duct leakage testing and verify airflow metrics.
Once the HERS testing is complete and the certificates are registered, the final step is the city inspection. A municipal building inspector will visit your home to review the installation. They will check the gas pipe connections, the electrical wiring, the venting clearances, and the overall safety of the setup. Only after the inspector signs off on the permit is the project legally and officially complete.
Working with a streamlined, by-the-book Mountain View HVAC contractor like Plum HVAC makes a massive difference during this phase. We expertly manage local municipal permits and inspections to prevent administrative delays, ensuring that the compliance phase is handled efficiently and your permit is closed out without a hitch.
Frequently Asked Questions About Furnace Replacement Timelines
Because the installation process involves so many moving parts, homeowners in the Mountain View / Bay Area often have specific questions about what to expect. Here are detailed answers to the most common questions regarding the timeline.
Can a furnace be installed in one day?
Yes, the physical installation of a standard furnace can typically be completed in one day, usually taking between 4 to 8 hours. However, this one-day timeframe only applies to the actual labor inside your home. It does not include the days or weeks required beforehand to perform load calculations, secure municipal permits, and order the specific equipment needed for your property.
Do I need a permit to replace my furnace in California?
Yes, a permit is legally required to replace a furnace in California. Local building departments mandate permits to ensure the installation meets strict safety codes regarding gas lines, electrical connections, and carbon monoxide venting. Furthermore, California's Title 24 energy code requires permits to trigger mandatory efficiency testing, ensuring your new system operates at the state's required performance levels.
How long does it take to get a new furnace ordered?
Ordering a new heating system can take anywhere from a single day to over a week, depending heavily on the season and the specific model you need. Standard units are often stocked at local supply houses, but high-efficiency or specialized models may require freight shipping from a regional warehouse. During peak demand periods, such as the September pre-heating rush, supply chain delays can extend equipment lead times significantly.
How messy is a furnace installation?
A professional furnace installation should not be messy at all. Reputable contractors take extensive precautions to protect your property, including wearing shoe covers, laying down canvas drop cloths along all walkways, and sealing off the immediate work area. While removing an old, dusty unit can stir up some debris, the technicians will vacuum and thoroughly clean the workspace before they leave, ensuring your home looks exactly as it did before they arrived.
How long does the whole furnace replacement process take from start to finish?
From the moment you schedule your initial consultation to the day the city inspector signs off on the final permit, the entire process usually takes between one to three weeks. The initial estimate and equipment ordering might take a few days, waiting for permit approval can add another week, the physical install takes one day, and scheduling the final third-party HERS testing and city inspection can take an additional week or two depending on municipal availability.
What factors can delay a heating system replacement?
Several factors can delay a replacement, both before and during the installation. Administrative delays, such as slow permit processing times by the city or backordered equipment, can push back the start date. On the day of the installation, discovering hidden issues like severely damaged ductwork, outdated electrical panels, or hazardous exhaust venting can require unexpected code upgrades, extending the physical labor by hours or even an extra day.
Secure Your Installation Schedule Before Winter Arrives
Understanding the complete timeline of a heating system replacement is the key to a stress-free project. A realistic timeline includes much more than just the day the technicians arrive; it requires careful planning, load calculations, municipal permitting, physical installation, and final safety inspections. Recognizing that this process can take several weeks from start to finish highlights exactly why you shouldn't wait for your current system to break down completely.
By starting the process during the September pre-heating season, you give yourself the buffer needed to handle administrative lead times and equipment ordering without suffering through cold nights. If your system is aging, struggling to keep up, or requiring frequent repairs, now is the time to act.
Take control of your home's comfort and avoid the winter rush. Reach out today to schedule an initial consultation and a professional load calculation, and let us help you map out a seamless, by-the-book replacement timeline.
hear what our satisfied clients have to say

.svg)
Service areas
.avif)